
Hey y'all. Happy Thursday! Just one more day until the weekend. I don't know about you but sometimes on these "short" weeks, I'm even more ready for the weekend than I normally am. It's a rainy, gloomy, day here in the DMV and I really wish I could be somewhere outside where it's sunny and beautiful (preferably near the ocean) instead of inside looking out at the blah. On the upside, at least I have a window at work to look out of. :) Glass half-full and all that. I hope it's sunny wherever you might be.
Well, for those of you that haven't heard, my daughter's getting married.
I don't know why but every time I say or write that I want to follow it up with "Married!?!", "Yes. Married. Geesh!" Yes, for many of you this confirms that I'm just a big ole Geek and 16 Candles Mega-Fan. I can't help it, it's one of my All-Time Favorite Movies. :D
Any-whoo, baby girl's getting married. Just a small event with some of her nearest and dearest. She and her sweet fiance Jordan gave me all of a months notice. WHAT!?! Yep. So, that means invites had to get done and quick. We all sat down in the studio and about 30minutes later, had a plan. Now I've just got to mass produce the invites and all will be good. Her colors are Purple and Teal. It's a shame my girl's afraid of a little color. Hahaha!
Here's what we came up with-
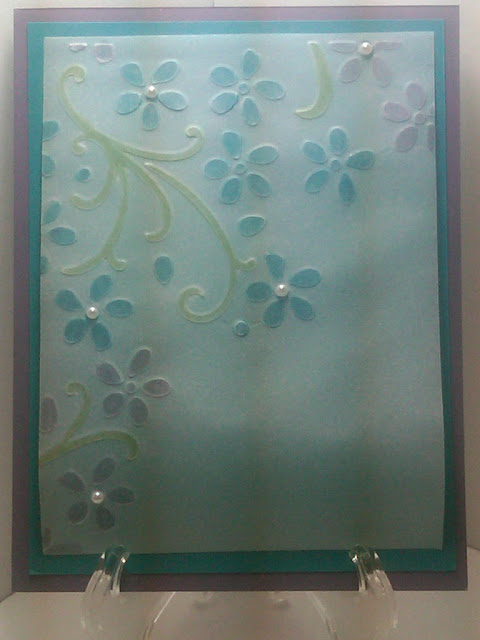 |
| Wedding Invitation featuring Elegant Bouquet Embossing Folder |
Embossing on Velum-
Here's what you'll need- Velum Cardstock, Embossing Folder and Embossing System (I used the Elegant Bouquet Embossing Folder and my Big Shot).
*Tip*- Make sure to use Velum Cardstock and not just Velum. SU doesn't sell the plain Velum anymore which makes it a little easier. I unfortunately only had the Velum and not the Velum Cardstock. The plain Velum tears very easily, which is why you should use the c/s if at all possible.
Here's what you do-
1-Insert your Velum into your embossing folder and run it through. The End.
 |
| See, isn't this a pretty effect? |
2- No really. That's pretty much all you do. How stinking simple is that!?! Ok, so that's not all, there are some tips to finish your project, but it's really mostly all. Try it, you'll see. :)
*Tip*- you may have to adjust your "sandwich" for the velum. I ended up using no tabs and running it back and forth through my Big Shot a couple of times. I got a very light impression. However, since the plain Velum is so fragile, if I used any tabs or any shims, the additional pressure made the impressions deep enough to tear my velum. :(
3- Apply your velum to your c/s and enjoy the beauty of your project.
Ahhhh, applying your Velum. You knew it couldn't be that simple right. Well it's still simple you just have to plan a little.
Because the Velum is so transparent you can see most adhesives. You might try SNAIL, but you know how I feel about that. It's a fabulous product, but I don't use it for most of my cards because the humidity where I live tends to make it not stick as long. When I give a card or project I don't want to worry that a layer might come off. Velum is sooo transparent that most of the time, even Mini Glue Dots show through. However if you've embossed your velum, you just might get away with it like I did. I adhered one Mini Glue Dot inside of one of the embossed areas to the upper left and one in the center of the embossed flower at the upper right. I didn't add any to the bottom because it would have been too obvious. (Scroll back up and look at the Ginormous picture for a closer view of where I placed them.) You can also cut your dots in half or roll them into a little ball to decrease the surface area and therefore the potential to be seen.

Alternatively, if you don't have embossing to hide your adhesive you can try adding embellishments like pearls or rhinestones to cover those areas.
4- Smile when you see your project and smile even more when you think of the smile it will bring to it's recipient.
Now you could leave it just embossed, and it would be pretty. But how about a "Two-Fer" Technique today? I water-colored my embossed areas with my my Classic Ink Pads and Blender Pens for a little added "Wow" factor.
Here's what you'll need- Classic Ink Pads of your color choice and Blender Pens
Here's what you do-
1- Take your embossed Velum and flip it to the de-bossed side (the side that's pushed in, not raised)
2- Using your Classic Ink Pads, get a well of color in the lid by opening it slightly and then pressing in the middle. The pad will press into the lid leaving ink for you to use.
3- Dip you blender pen into the color on the lid and then color in your de-bossed areas. It really is that simple. No kidding this time.
 |
| Sorry for the shadowy, dark image. It's kind of hard to take the picture with my non-dominant hand while I try to give the impression that I'm coloring. :) |
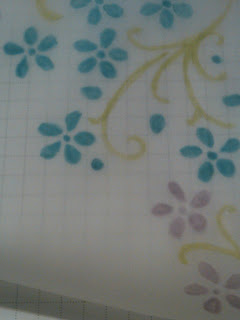 |
| BTW- I used Perfect Plum, Island Indigo and Lucky Limeade for the colors |

Pretty big difference. This gives such a soft, elegant effect. It was pretty just like this, even more so after it was mounted to the Island Indigo c/s. I did add just a few small pearls for a finishing touch.
I know you're probably asking yourself "Where's the inside, Shan? You always do an inside." Well, I'm working on it. I just have to tweak the coloring a little in MDS and then it will be completed. I'll be sure to post that soon.
So what did you think? I hope you liked today's card and technique. More than that, I really hope I've inspired you to try something new. :) As always, if you try this technique, I'd love to see what you come up with. If you have questions or comments about today's card, be sure to leave me a message below. I love hearing from you and read all of them. Better yet, you make my day with them, If you'd like to +1 or Pin today's project I've put those buttons on my blog for your convenience. Friends and Followers are always welcome too! :)
Thanks so much for taking time out of your busy day to stop by my little corner of the world. You are very appreciated! Till next time-
Remember- Life is often more about the storms than the peace they seek to overwhelm. It's not about Waiting for the storms to pass, but Learning to Dance in the resin.
Be Safe,
Shan
No comments:
Post a Comment
Thanks so much for taking the time to share a little love with me. I hope you find this blog to be as much of a blessing to you as you are to me. :) Be Safe- Shan