Hey y'all. Happy Friday! It's overcast here in the DMV and we're expecting some strong storms to sweep through today. I hope it's warm and sunny wherever you are! Do you have plans for the weekend? I'm going to the Big Crawfish Festival tomorrow, so maybe I'll be able to do something Digital with that for next week. Do you like Crawfish? I Love them and wait till you see the amount of them and how they cook everything. Unbelievable!!! As much as I love crawfish (and the free beer that comes with it) in spirit I'll be in Colorado. A sweet, fun, young lady that I know will be graduating from High School and I'm so excited for her! I was trying to come up with a card for her and ended up with two and couldn't decide which one I liked best.What to do? I sent her both of course! Why not, it's not every day you graduate from High School. I showed you the first one earlier this week.
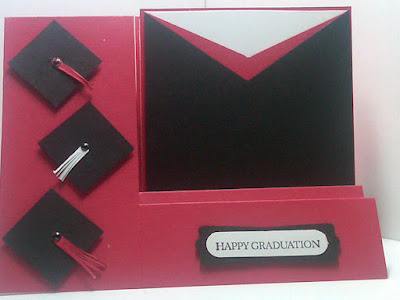
Here's the second one-
 |
| Side Step Graduation Card with Extra Card |
Here's the original card design-
 |
| Side Step Graduation Card |
Here's the matching card-
Very simple. I used a card base of Real Red and then added the other layers to create a gowned effect (at least I hope she thinks it looks like one) and then popped those layers up. You know I like to add a little something extra to the inside of my cards to make them pretty too. I added another cap & tassel to the inside, but wrote my note before I attached everything so no picture for you. :( Sorry. I have Horrible nurse writing and didn't want to risk attaching everything to the inside and then messing up the writing and end up making the whole card over again. LOL!
Before I give you the instructions for this technique I just want to give my girl a shoutout, just in case she checks this out-
Way to go Alex!!!!! SO excited for you. Enjoy your special day and everything that comes with it. You deserve it. I forgot to put in a coupon for Noms with your other card, so here's my I.O.U. for treats next time you're in town. Or, if you decide you need some before then, let me know and I'll "Food-Ex" them to you. I've got some new recipes I think you'll like. Congratulations!!!!!
So here's what you need to make this style card- Cardstock, Paper Cutter, Scoring Tool ( I used my Simply Scored), Bone folder and stamps/DSP as desired for decoration
1- Cardstock cut at 5 1/2 x 81/2.
2- Score at 4 1/4 all the way across the c/s, This is your center fold.
3- On the short edge position your c/s at the 3 1/2 mark and cut from 1 1/4" to 6 1/4" this is all you need to cut. This will give you a 2" wide section to decorate.
3- On the long edge score in to the cut line on the following marks- 1 1/4, 2 1/4, 3 1/4, 6 1/4.
4- Fold at 4 1/4 and use your Bone Folder to make the fold crisp.
5- Fold on the other score lines starting up from the bottom and then use your bone folder to again make sure the lines are crisp.
6- Decorate the panels however you would like. The only limit is your imagination.
7-Smile when you see your finished card and think about the smile it will hopefully bring to it's recipients face.
I put off making one of these cards for the longest time, because I was afraid it was going to be difficult. It was definitely not hard and I will be making more of these for sure!
I hope you liked today's project and I hope it inspires you to make something new and different for someone special that you know. I really hope A enjoys her cards, although I have a sneaking suspicion she'll be more excited by the I.O.U. for noms. LOL! I love feeding that girl, cause she always enjoys my snacks. She's even been known to share a little. (And I do mean "a little!) What a girl! :)
If you liked today's project, feel free to leave me a comment. I love hearing from you! If you'd like to +1 or Pin it, I've put the buttons on my sidebar for your convenience. Friends and Followers are always welcome too! :)
I hope you have a beautiful, sunny, and dry weekend with plenty of time for Family, Friends and of course time for creativity. Till next time-
Remember- Life is often more about the storms than the peace they seek to overwhelm. It's not about Waiting for the storm to pass, but Learning to Dance in the rain.
Be Safe,
Shan


No comments:
Post a Comment
Thanks so much for taking the time to share a little love with me. I hope you find this blog to be as much of a blessing to you as you are to me. :) Be Safe- Shan